Saturday 14 June 2014

Iteration 3

The third iteration was most definitely a test of patience. Was it successful? It depends on perspective.
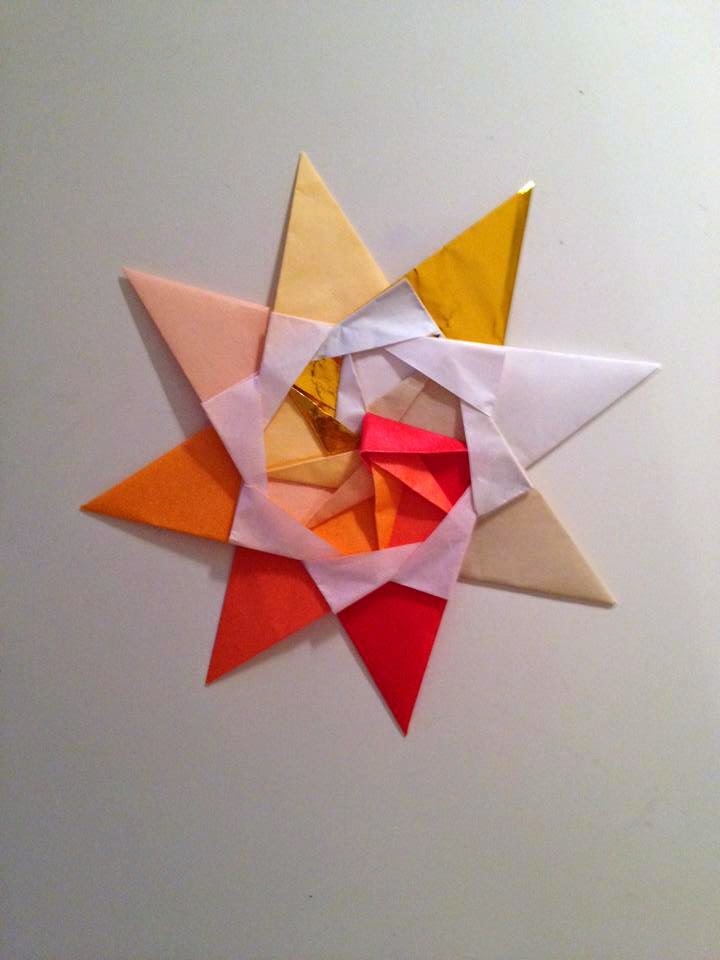
Now the first task of this iteration was deciding the model. What challenges should I tackle next? Should I create a completely new figurine? Perhaps a cube? I really wanted to incorporate the lessons and forms I had learned from my first two iterations. For my earlier posts, I had learned the steps of a kusudama ball for my first iteration while exploring the themes of nature for my second one.  Now what kind of figurine incorporates these two ideas? It is none other than Maria Sinayskaya's Little Roses Kusudama! This figurine was perfect for the third iteration.
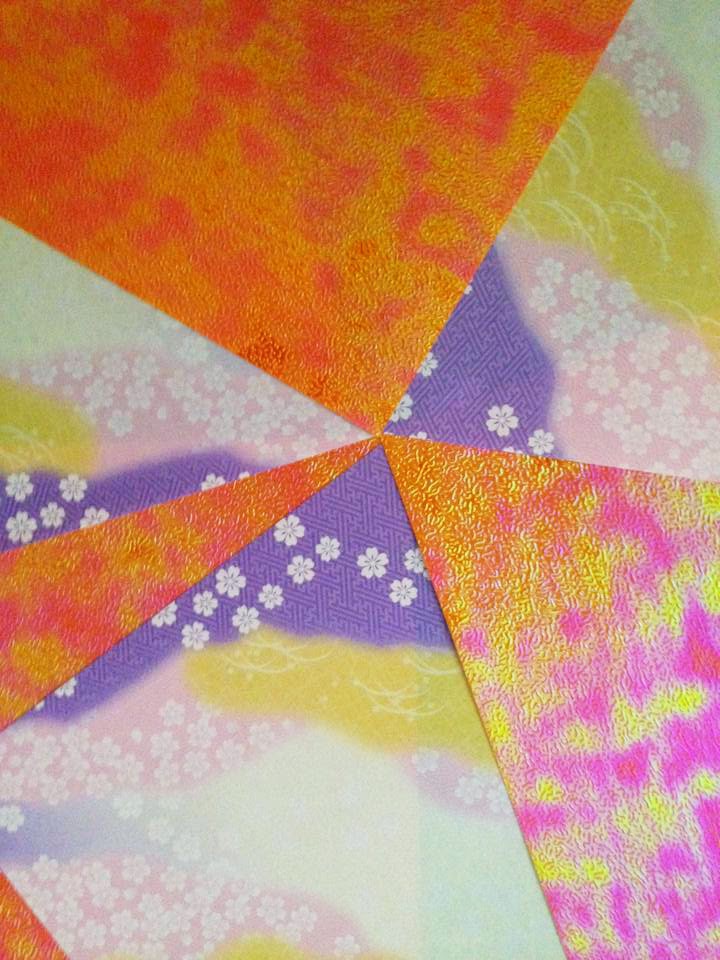
I thought a colorful spectrum for the paper design would be a wonderful touch to this modernized figurine. It will also allow the rose detail to stand out. With the paper and model decided, it was time to find a video tutorial. Luckily the owner of the video from my first iteration had also made a tutorial for this figurine. The best part was the assembling step wasn't as difficult to follow this time. It was still fast forwarded but a portion of it was explained more thoroughly. I decided it was again time to face the assembling challenge in modular origami. This time perhaps I can be successful. That thought disappeared after hours of trying to assemble my first attempt.

 
I didn't realize the colorful spectrum I chose would actually become a downfall in the process. As for the folding steps, it was surprisingly easy to do although time consuming. It wasn't until I tried assembling the thirty pieces of folded paper that I realized the paper was too silky, causing the paper to constantly shift and becoming impossible to assemble together. The more I thought about it, the more it made sense; after all, to achieve this transparent quality, the paper itself should be made from a material other than your usual origami paper. Hence why the material felt so smooth (or slick even). This kind of material sadly is unfit for origami figurines that require assembling. But since hours have already passed, I didn't want to let this go to waste. I tried paper clips to hold the base of the figurine in place while building the rest of it, hoping to salvage my lost time.


Sadly this idea didn't work. The wonderful paper design I thought to be perfect for this iteration resulted in a second attempt to create this figurine. I was disappointed in myself for not realizing my mistakes sooner. After all, this was the same lesson I had learned from my first iteration. I suppose since I never used such a silky paper like this for origami, I never thought this type of paper would have such a drastic impact on the outcome of this figurine. So, I decided to use another paper design: the polka dots. It still had the color spectrum I wanted except in dotted form. As for the paper itself, the material was your average origami paper. The results? The assemblage step was definitely easier and the paper pieces did held together!


Although the dotted paper was a better choice, I must confess the task of making this figurine whole wasn't straightforward. At least the task was less demanding now that it actually held itself together. I eventually decided to stop watching the video tutorial and tackle the challenge myself. (I even had asked my mother to help but after a few hours, our origami argument left me to deal with the task alone again.) I managed to actually piece most of the parts together but sadly five remaining pieces were left. You can say I cheated a bit. Even so, I'm actually surprised at myself for managing to piece most of the figurine together. That task itself has made me proud and glad that I chose origami as my topic for this project. After all, I have finally managed to assemble a modular origami figurine on my own. I consider this a life accomplishment. And with that, the project is officially finished!

Monday 9 June 2014

Iteration 2

My second iteration was more successful than my first... after a second try that is.
Originally planning for a geometric figurine like my first iteration, it wasn't until I discovered a video tutorial (link here) for an origami figurine called Corona Boreale Star that I decided to change my approach. I originally wanted to only create figurines that focused on geometric structures and were considered modular models. I hadn't thought about approaching figurines that dealt with animals or forms that symbolized nature. After seeing Maria Sinayskayam's Corona Boreale Star however, I decided take on the challenge of creating this figurine. After all, the whole project was focused on process and it did allow me to experiment.

After shopping at Daiso a second time, I decided to create a star with a bright palette adorned with patterns of nature. I thought this would evoke the traditional aspect of origami within the Japanese culture. The color choices themselves seem to have a more modern take which suits the geometric folds Sinyaskayam designed for this figurine.


Now, this tutorial was actually much more simpler than my first iteration. The video clearly explains every step in a one by one manner, even explaining the same directions from the process before. Admittedly, the video did get repetitive but I found it helpful since it showed the whole procedure. No steps were skipped or explained without the video's visual. One of the difficulties I had from my first iteration was that the tutorial video for the kusudama actually fast forwarded some steps or was edited out. These steps were the ones I needed the help most and a visual aid would have been more than informative. Luckily this was not the case for my second iteration. As for piecing the whole Corona Boreale Star together, I managed to assemble it. Perhaps the fact that this was a more 2D figurine (unlike the kusudama) made the task easier for me. Even so, I think some mistakes were made. I might have made a few errors in terms of assembling the star's swirl pattern. My paper size could have been slightly problematic since it was larger than the required size. I notice it was difficult to construct the star as a whole due to this factor. Certain ends wouldn't line up correctly and were blocked by the points, thus making the swirl pattern incomplete. I tried correcting it although I'm not sure if my attempt was successful.


 Hence why I decided to create it again with smaller sized paper. I didn't have much of this paper size but the various colors from the packet gave me an idea. I decided to use a vibrant palette that showcase the tint change of a hue. In this case, the order of the tint change would be something along the lines of red, orange, gold, yellow, and white.


I found this assemble a better success than my first attempt. I can happily say this time the iteration was a success! I wish I could have documented this a bit better but I was too engaged in folding. Overall, I'm satisfied that I managed to complete Maria Sinayskaya's Corona Boreale Star. For those who want to know more about her, here's a link of an interview!

Saturday 7 June 2014

Iteration 1


The first iteration was more of an interesting process than a complete success in finishing the figurine.Now, I already owned a few origami supplies myself (first picture, left). I wanted to see other selections of patterns and styles so going to Daiso was an ideal place to find all this (second picture, left). I grabbed what I thought was appropriate at the time since I was still unsure of what figurine to create.

It wasn't until I did more research (e.g. youtube tutorials, personal blogs, etc.) that I decided on my first iteration's figurine: the kusudama. What is the kusudama? The actual word means "medicine ball" in the Japanese language (Lukasheva 7). They were possibly used as incense in Japan since they were made from herbs (Lukasheva 7). In the origami culture, there appears to be various versions or variations of the kusudama as you can see here. The model I chose to create is called Estrella Flor which was created by Erny. Here is the tutorial I used.


I specifically chose to mix different styles of paper. For this model, I decided on traditional patterns with paper that reflected bright colors (as seen on the right). I thought it would be an interesting contrast, especially with the glittering orange accompanied by the other paper's hues of purple, pink, and yellow. The flowers from the patterns seem to add more to the aesthetic appeal. It wasn't until midway of the process that I realized there wasn't enough paper to use. Hence, the additional colors that was added later on. Hopefully the combination of all these different papers doesn't seem too random. As for the folding process, it wasn't as difficult as I had expected it to be. It was quite repetitive and by the third folded model, I had already memorized the steps from the video. Patience was definitely a large factor in creating the whole structure. I originally thought the required thirty sheets of paper wasn't too laborious. Five hours later I changed my mind.


It wasn't until I reached the assembling step that I experienced a problem... or problems. I noticed an extra triangle in the main point of my model. I had 6 points while the video showed 5 points. That's when I realized I might have accidentally made more structures than necessary. Even so, I think assembling it all should still be doable. I tried various combinations and ways but sadly, I couldn't accomplish it. My figurine kept shifting the whole time. I noticed the video's kusudama didn't shift the slightest.

That's when I realized several possibilities for the cause:
1) My inaccurate folding during the process.
2) The cutting of the origami papers into two equal sized strips might have been uneven.
3) The different thickness of the papers.

Towards the end, I experienced some difficulties and realized several mistakes. I wasn't able to complete the figurine but I am somewhat content with the result below. Hopefully I can complete the second iteration with more success. Until then, I'll enjoy the attempted kusudama I've accomplished.


Sources:
Lukasheva, Ekaterina. "Preface." Kusudama Origami. : , . . Print.

Friday 6 June 2014

History Pt. II

Image Source: Google
How was origami perceived in the Western world? Was it different than how the East perceived it? Were their similar techniques practiced? According to Engel, "the earliest practitioners of origami in the West were the Moors, who are thought to have brought paper and paper folding to Spain when they invaded that country in the eighth century" (18). However in 1492, the Moors were expelled from Spain during the Inquisition, thus preventing a chance for paper folding to be considered "a predominantly Spanish past time" today (Engel 18). As for the techniques or practices the Moors themselves had created, little is known about this although it is likely centered around "folding properties of the square" (Engel 18). This indicates most of their folding techniques are of purely geometric shapes. This is contrasting to what the Japanese explored as their origami exploration was for artistic and ceremonial purposes. Later on, modern origami or modular origami became a trend. This practice followed "strict mathematical ratios of angels and edge lengths" (Engel 18). It often "prioritizes a puzzle aspect to the folding, and the challenge of folding a single square of paper without using cuts or glue" (History of Origami). These creations were highly regarded as some of these origami models are copyrightable material or intellectual property (History of Origami). Akira Yoshizawa himself was a forefather figure in modern origami (History of Origami). "In the 1930s, he developed a system of folding patterns employing a set of symbols, arrows, and diagrams" (History of Origami). These were published by the 1950s and helped origami reach a global scale and standardization (History of Origami). Origami as a result became publicized art with several local and international organizations being formed (History of Origami).


Source: Pacific Shoji Works
Paper is a vital material in origami for obvious reasons. It is the main material use to construct the figurines in origami culture. However, what was the history for paper in Japan? It is definitely a vital raw material that has been used in various ways. To make paper, the Japanese grew trees in the wild and used their own techniques and skills to produce the vital material (Ogawa). These skills that make Japanese paper by hand are still "transmitted from father to son" today (Ogawa). As for the use of paper (with the exception of origami), it has been used to create spaces for living with the shoji of Japanese interiors being a prime example (Ogawa). The right image shows this interior. The paper "retains heat yet is porous enough to allow the circulation of air" as well as permitting "a sofgt light to prevade the interior and gently bathe the people there" (Ogawa). Other ways paper were used include creations of kites, pinwheels, umbrellas, and more. Overall, "the Japanese have inherited from their ancestors pastimes and customs involving many different ways of folding and assembling paper" (Ogawa). We can see this heavy cultural impact and influence being celebrated during festivals such as the Festival of the Weaver Star where paper cranes are made to send wishes to the heavens and streamers being solely constructed by paper (Ogawa).
As for the Westerners, what was the history for paper in their culture like? A prime example for them would be the use of paper for sculptures. "Paper sculpture has been widely used for such applications as window displays" since the 1930s (Ogawa). Pablo Picasso and Alexander Calder are some of the artists that have created these sculptures while architects have used paper as "structural components" (Ogawa). Architect Buckminster Fuller himself have designed "a geodesic dome made of paper and bamboo" (Ogawa).


For those who are interested more in modern origami or in modular structures, here is Robert Lang's TEDTalk below. Enjoy!


Sources:
Engel, Peter. "A Paper Folder's Finding." 24: 16-22. Web. 28 May 2014."Frequently Asked Questions."

"History of Origami." PBS. PBS, 30 Nov. 2009. Web. 28 May 2014. <http://www.pbs.org/independentlens/between-the-folds/history.html>.
Ogawa, Hiroshi. The Art of Papercaft. London: Batsford, 1971. Print.
Lang, Robert. "The Math and Magic of Origami." TEDTalk. Feburary 2008. Lecture.

Tuesday 3 June 2014

Materials Pt. I

Image Source: Kawaiicph
Floral, checkered, polka dots, swirls, and more. Origami paper comes in many variations; it can range from plain solid colors to the bright colors from a traditional Japanese pattern. How many of these required sheets of paper will depend on the type of model you have. Besides sheets of paper, I will be using bone folders and rulers to help me make sharp creases. Perhaps a pencil is also best to keep at hand to help me mark a perfect fold when necessary. I'll try to avoid relying on this and calculate the precision myself.

As for the required amount of paper needed for an origami figure, that factor is dependent on the amount needed to create the origami figure itself. Traditionally, a single sheet of paper is used and is folded "without cutting or pasting to produce a sculpted representational figure" (Engel 18). For most of the basic traditional origami forms, the paper starts out as a perfect square; as Engel points out, "for a purist, only a perfect square will do" (18). Modular origami however requires more than one sheet of paper since more than one sheet is folded "into units and combined to make one model" (This Is My Origami). Usually 30 units is the amount "but there are some that use more and some that use less" (This Is My Origami). (Units simply refers to the amount of sheets that are being used.)
As for the size, it truly depends. I found various sources recommending sizes of 7 x 7 cm, 4 x 12 cm, and even 10 x 10 cm for their tutorials. It truly will depend on the model. If size was to be experimented, folding steps would not be affected with squared papers since "geometry dictates that the same configuration of folds that worked for the large square can work for reach of the smaller squares" (Engel 20).


Sources:

Engel, Peter. "A Paper Folder's Finding." 24: 16-22. Web. 28 May 2014."Frequently Asked Questions."
This is my Origami. N.p., n.d. Web. 29 May 2014. <http://thisismyorigami.tumblr.com/FAQ>.

Monday 2 June 2014

History Part I

Image Source: Wikipedia
Now, most of us are familiar with origami in terms of the crane (as shown on the left). However, origami is actually a more complex subject matter than this iconic model.

The term, "origami" originated in Japan which combines the word "oru", meaning to fold, with the word "kami", meaning paper (History of Origami). Before this term was used, the term "orikata", or folding shapes, was used to describe this disciplinary until the late 1800s (History of Origami). Material requirements usually involves a single sheet of paper that is folded "without cutting or pasting to produce a sculpted representational figure" (Engel 18). Most of the time the paper is a perfect square shape (Engel 18).

Image Source: artclubblog

Besides coining the term, Japanese society regards origami with high respects due to its social impact in history, especially in its involvement with art and ceremonies (Engel 18). To start off, paper was a rare novelty and a precious product that only the Japanese nobility could afford (Engel 18). Thus, origami became heavily integrated into their lives, becoming a significant past time or a hobby for the nobility by the Heian period (Engel 18). Engel states this period took place during 794 to 1185 (18). Other uses of origami include wrapping paper butterflies onto rice wine or sake to represent the bride and groom during wedding celebrations by the Shinto noblemen (Engel 18). Samurai warriors also used origami as tokens of good luck which was decorated onto strips of abalone or dried meat to trade with gifts. Later on, paper became inexpensive enough to produce by the militarily-ruled Muromachi period, or during 1338 to 1573 (Engel 18). This allowed everyone to access paper as well as allowing origami to assume "a new ceremonial role as a means of social stratification" (Engel 18). In other words, a social class system was established that was symbolized through the use of origami. For instance, the samurais of the aristocratic class were distinguished by the fact that they use the Ise manner folding technique for origami (Engel 18). Farmers and peasants also folded but as Engel puts, "people knew their place, and they folded accordingly", indicating they folded with different techniques (18). It wasn't until the Tokugawa period that Japan experienced a period of rich culture and art like England's Elizabethan Age that origami became open and democratic for everyone (Engel 18).


Sources:
Engel, Peter. "A Paper Folder's Finding." 24: 16-22. Web. 28 May 2014.
"History of Origami." PBS. PBS, 30 Nov. 2009. Web. 28 May 2014. <http://www.pbs.org/independentlens/between-the-folds/history.html>.

Monday 26 May 2014

Entry 1: Introduction

Image Source: Behance
We use it for writing; we use it for note-taking; we use it for books; we use it for printing.
Paper is an everyday material we come across and use in our daily lives. All my life I've used paper for various purposes except one: origami.

Creating, using, or designing anything in 3D form has always been a weakness of mine. I usually coward away from the task but not anymore. For this project, I decided origami was a good fit to explore paper as a crafty material for three-dimensional designing. I remember origami being a huge craft in my childhood. While I participated by watching, everyone else was folding away, including my grandmother who helped popularized this origami movement in our neighborhood. I hope this project's process will help me hone some crafting skills and build a foundation for 3D designing. I'll be making three iterations, choosing three different forms or tutorials from this blogger's master list. Other sources for this process will come from YouTube tutorials, fellow bloggers, Pinterest, and DIY projects.

Let the folding begin.